Alert Setup
What is an alert?
Alerts basically monitor the conditions of a specific IP address, and then do something when those conditions exceed a specific range. The things you can do with an alert are:
- Send an email
- Play a sound or .WAV file
- Log to a text file
- Change the tray icon / show a message
- Launch an executable
For example, let's say you need to know when a destination you're monitoring stops responding. You can attach an alert within MultiPing to that IP address so that you receive an email alert if the last 10 of 10 sample requests are lost.
Another possible alert condition to check for is if the average for the last 10 samples is > 500 (or any other number). You can send an email alert, maybe play a .WAV file (if you're usually within hearing distance) or both. Also, if you're trying to show your ISP there's a problem, you might log the data to a file so you have records of every time it happened over a time period.
One user had hardware problems with his cable modem. He set up an alert that launched an executable that then communicated with a device attached to his computer to reboot the cable modem when alert conditions were met. There are a whole variety of things you can do with alerts and events.
Alert setup can at first seem confusing, but it involves these four steps
- Setting the Alert Name
- Setting up the Condition that will trigger the alert.
- Specifying the Event(s), or what you want MultiPing to do when your alert(s)s are triggered.
- Tying the alert to a target that you're monitoring.
What is an event?
Events go hand in hand with alerts. Any number of events can be created with an alert - so that when some conditions occur, something happens. The "Alert" part specifies the conditions and serves as a container for the events. The "Events" specify what action(s) will happen. You can have any number of events tied to an alert, and any number of alerts tied to a host. Note: You must have an alert tied to an IP address before it will work. Keep reading for more details.
Alert Dialog / Settings
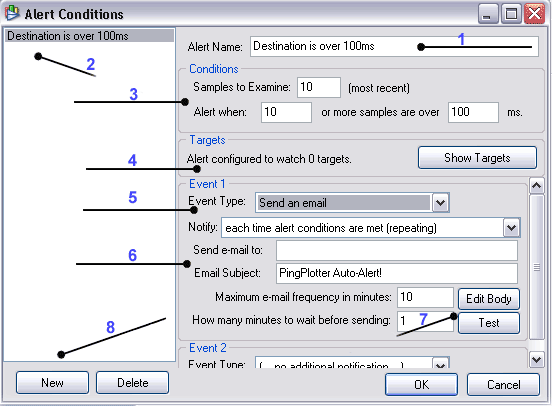
Alerts are defined in the Alert Setup screen under the Edit/Alert Setup menu. Once there, you'll see an image similar to the one above. (Note: if you haven't setup an alert before, you won't see any alerts listed in the list area on the far left of the screen shot). This screen is pretty busy, but also pretty self-explanatory. From the screen capture above, you can see that we have (labeled on the image with corresponding numbers in this list):
- The Alert Name. In this example we're using "Destination is Over 100ms".
- The list of alerts you currently have defined. You can see from the image that we have two defined.
- The Conditions for the alert. In other words, what has to happen for this alert to fire.
- The Show Targets button that allows us to see how many targets/hops this alert is assigned to, as well as the IP address or DNS name for that hop or hops. If this alert is set to watch 0 targets, then the alert will not fire! We discuss this in more detail later in this topic.
- The Notification/Trigger Events for this alert. An unlimited number of events can be tied to an alert, but most likely you won't use more than four or five. Please see the Event Notifications/Trigger Notifications section for all of the trigger notifications available.
- Each Event/Trigger Notification will allow you to "do something", based on the overall type of alert you're defining. For example, with a Tray Icon Alert you define the message the pop-up will contain, a Send an Email Alert needs to know where to send the email and with what frequency to send, a Play a Sound Alert needs to know what to play, etc. You enter that information here under the trigger event.
- (These options are only for the Send an Email Event type). The Edit Body button will take you into the email Alert Email Body Editor, where you can fine tune the alert message body for optimal viewing on a cellphone, pager or other type of handheld device. By clicking this button, you can verify that your email settings are correct, and what your alert email will look like.
- To define a new alert you click on the New button. To delete an alert, highlight that alert in the list above these buttons and click on the Delete button. When you're done defining the alert click the OK button. Cancel exits this screen without saving anything.
So referring to the image above, you can see we have an an alert with a Condition defined where when the last 10 samples are greater than 100ms, we want MultiPing to email us. We've called this alert "Destination is Over 100ms ". If you were watching for a timeout, you'd enter 9999 instead of 100. Do note that 9999 is not a magic number. A lost packet is always greater than any number entered, so you can use 1000, or 20000 here and a dropped packet will exceed either of those numbers.
Setting up an alert.
It's usually best to start out with an alert and event that's easy to verify - like playing a sound, or changing the tray icon. So, let's set up the alert to play a sound when packet loss goes about 40%. Packet loss is a big bad thing, and in many cases is more important than latency. We run a similar alert at Pingman Tools HQ pretty much continuously.
- Run MultiPing and go to the "Edit/Alert Setup" menu. If you've never set up an alert, you won't have any listed here.
- Hit the "New" button (near the bottom left).
- Enter a name for the alert (We’re using "Server is Down") in the "Alert Name" section.
- In traces to examine, use "10". Set it to alert when 4 or more samples are over 9999. (Note: 9999 is not a magic number. A lost packet is always greater than any number entered, so you can use 1000, or 20000 here and a dropped packet will exceed either of those numbers). That setting will alert when 40% packet loss is achieved. The 40% comes from saying to alert if 4 of the last 10 samples were dropped. You might want to do 40 of 100, or 2 of 5 - it depends on the period of time you want it to look at. You probably *don't* want to notify if only one sample is lost, but maybe 2 in a row (which would be examining 2, and alerting if 2 or more traces over 9999). Lots of things you can do here.
Alerting on packet loss.
A common condition to want to alert on is packet loss. The fields you need to manipulate are in the Alert setup screen is the "Alert conditions" portion.
Example: Let's say you want to notify when packet loss equals or exceeds 40%.
To do this, set "Samples to Examine" to 10, and Alert when "4" or more samples are over 9999ms. A lost packet always exceeds any number you enter in the threshold area, so if you want to consider only explicitly lost packets, set this to 9999. If you want to consider any really high latency packets as well, set this to something lower (maybe 1000 or 1500).
This only examines the last 10 packets, but let's say you want to examine a higher period - and notify on a lower packet loss percentage.
Set Samples to examine to 10000 (or some other high number). Alert when "500" or more samples are over 2500ms. This will alert when you hit 5% packet loss over a period of a few hours (depending on what trace interval you use).
Picking an event.
Next, select what you want to happen when the alert fires. We're going to "Play a sound" (This is in the Event 1 area). Notice that as soon as you change the "Event type" to "Play a sound", that "Event 2" will appear, with "(.. no additional notification ..)". You can have as many events as you like - and to delete an event, just change its type to "(.. no additional notification ..)".
As soon as you pick an event type, a set of options relating to that event type will come up. The "Notify" dropdown is described in more detail elsewhere. For more details on how to set up a sound event, click here.
For this example, use "Notify: each time alert conditions are met (repeating)" and then hit the folder icon beside the "Play Sound:" edit field. Browse to an appropriate sound file (.wav or otherwise) on your computer to fill this box.
Using this event, each time a sample is sent out and the alert conditions are met, the selected sound will play.
Tying an alert to an IP.
Once you've got your alert set up, you need to tell it which IPs to "watch" for those conditions. To do this, trace to a destination just like you normally would. Once the path has listed, pick the router/destination from the list you want to monitor - and right-click on the hop number. From the popup, select "Watch this host (Alerts)...". If you want to monitor a destination that isn't responding for some reason, just right-click on the lower time-graph for that host, and you'll have a similar popup menu.
You'll get a dialog that shows the DNS name (if there is one) and the IP address you selected - and then a list of available and selected alerts. Move the alerts you want applied to this IP address into the "Selected" list - and then close the dialog. Monitoring will start immediately.
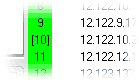 When a hop is being monitored for an alert, the hop number will have brackets around it (i.e.: [10]). You can stop monitoring by right clicking on the hop number and selecting "Watch this host (Alerts)..." and then removing any alerts from the selected list.
You can stop monitoring by right-clicking on the hop number, selecting "Watch this host (Alerts)...", and then removing any alerts from the selected list.
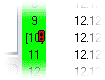 Any time an alert has fired, MultiPing will let you know by putting a red exclamation point (!) next to a hop that has had an alert fire. This is particularly handy when you have an alert that doesn't give you visual or audio cues normally when it fires, like a Send an Email Alert. Now you can see it on the main MultiPing screen before the alert email gets to your inbox.
Editing the body of an email
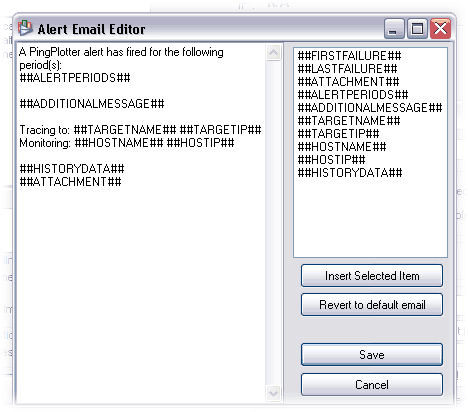
The Alert Email Body editor allows you to fine tune the body of the alert email to whatever makes sense for your particular receiving device.
For example, if you have alert emails going to your cellphone's inbox, you may only want to have the Target Name, First instance of Failure and Last Instance of Failure in the email. If you have any more text than that, it will be too long, your cellphone will truncate it and the text is pretty much useless to you. We recognized the fact that a lot of people are using RIM devices, pagers or cellphones to receive alert email, and so now we have an editor to help you out.
You can customize the email body text to your liking in the left pane's editor, highlighting attributes on the left and clicking the Insert Selected Item button to enter that attribute into the body text to the left. This ability to highlight and insert the alert specific attributes is a great way to avoid typographical errors, and is highly recommended. When you're done with your changes, just click the Save button to save your new alert email body. If you get to the point where you want to start over again with the original email, just click the Revert to default email button and then start your changes anew. If you change your mind about editing the email body at all, just click the Cancel button to go back to the Alert Editor.
A note about "average" response times.
Average response times are a problem. The real problem with mean averages is when a server stops responding - what is the average of the last 10 samples if the last 10 were timeouts? Because of the problem with this we always do "when X or more samples is > Y" (this is a median average). You can still get your alert to work like an average - by saying "when 5 or 10 samples exceeds 300 ms" (this would be like a mean average over 300ms, but would also fire when there were lost packets).