Setting up an Email Alert
Now that you're a bit more familiar with alert configuration in MultiPing - we'll go over the steps to create an email alert!
Before you can configure an email email alert, MultiPing needs to know how to send email through your mail server. For information on how to configure your email settings - check out the MultiPing manual.
We want to make sure that we don't get flooded with emails if something were to go wrong with one of our targets - so we'll be setting MultiPing up to send us an email when a targets' latency is high, and then send us another email to let us know when it's returned to normal (this sounds quite a bit better than a few dozen "Your target is still experiencing problems" emails, doesn't it?).
To get started, go ahead and open up the alert configuration screen (either via "Edit" - "Alert Setup," or by right clicking on a target, selecting "Watch this host," and then clicking on the "Edit alerts" button). Create a new alert (click on the "New" button) and give it a name that's meaningful to you (we'll be using "Email alert" for this example).
For this example, we're considering 350ms as high latency, and anything below that acceptable (you may have different needs, so feel free to adjust these values as you see fit). We'll set our "samples to examine" to 10, and then have MultiPing let us know when 10 or more samples are above the 350ms threshold.
This alert is going to have two events - one will be the email that's sent out to let us know that conditions are exceeding the 350ms threshold, and the other will be an email to let us know when conditions have returned to normal.
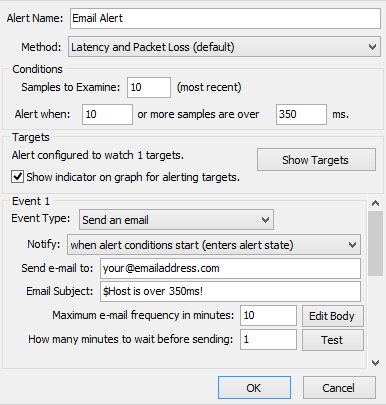 For the first event, set the event type to "Send an email", and set the "Notify" option to "when alert conditions start (enters alert state)." Next, fill in the "Send email to" field (ideally with your email address - but you can enter multiple addresses if you need: just separate each address with a comma or a semi-colon), and enter an email subject (don't forget that you can use variables here too!). Once everything looks to be in order with your first event - go ahead and click the "Test" button.
If MultiPing was able to communicate with the SMTP server you entered in you email settings, you'll get a pop-up message box telling you that the message was sent (and you'll have an email waiting for you in your inbox). If you don't get this pop-up, but instead get a "Socket Error" message (or any other error message) - check out some of the links at the bottom of this page for a possible solution.
 Once we've verified that we've received the test email, and everything appears to be working - we're now ready to set up event #2. The configuration for this event will be very similar to event #1 - except you'll want to set the "Notify" option to "when alert conditions end (leaves alert state)." You may also want to set the email subject to something a bit different (so you'll quickly be able to know that conditions are back to normal when you get the email).
You've likely noticed by now that we have changed any of the values for the "Maximum email frequency in minutes" or the How many minutes to wait before sending" fields, so now is probably a good time to go over both of these options. The maximum email frequency is self-explanatory - wait X minutes (in this case 10) before you send another one. You may be wondering about the How many minutes to wait before sending: value though. This value tells MultiPing to wait a minute (or more if you set it higher) and see if this was a temporary situation, or if it's a more permanent problem. You can specify 0 or fractional minutes here if that's appropriate. Using 0 will send the email immediately. Leaving this value at one minute (or bumping it up higher) also allows you to gather more information to be included in the email itself.
With both events set up in the alert - you can now click on the "OK" button and save it. Now when you right click on a target and select "Watch this host," you'll now see your new email alert in the available alerts column. Congratulations! You now have a very powerful email alert that you can assign to any of your targets!
More Info:
- MultiPing Manual: Email settings
- MultiPing Manual: Event - send email
- Knowledge Base Article: Using SSL for sending alerts
- Knowledge Base Article: Alerting on multiple targets/best practices
- Email error related Knowledge Base articles: